Sunday, September 22, 2013

Revamped Planner

I have been quiet on my blog, haven't I? I've been busy working mostly on gift projects and projects I am hoping to be published, so a lot of the things I have completed are top secret! SHHH :)

I did just finish this fun planner, which I will be entering to Ribbon Carousel's Back to School Challenge. With my going back to school around the corner, I wanted a fun planner I can use. Most people thought it was strange that I wanted a planner when we all have our handy smartphones, but there is certain satisfaction I get from writing things down and crossing things off a to do list. It makes me feel more accomplished! Of course, instead of me spending close to $10 on a cute planner, I decided to put my craft supplies to good use!


Supplies:
Basic Planner ($3 from Big Lots!)
May Arts 382-34-46
Remarks Alphas
Modge Podge


I took a 12 X 12 cardstock and created a standard book cover (I completely forgot to take step by step photos on how I did this, but I promise I will show you in a future post!). I wanted something I can use over and over again, so I simply used my planner as a template. This allows me to change to a different planner when a new year starts.


I decorated the book cover and sealed it with Modge Podge to make it sturdier.


I finished it up by making page flags using washi tape!


Thanks for stopping by and please stop by and keep an eye out for my book cover post! 

Monday, September 16, 2013

Hiatus and a Grand Opening.

I have just started a new job and have been working semi-non stop in order to learn everything I can to be successful in the job, so it definitely has caused a pause in my social media life, but don't fret! It's just temporary.

Ironically, I was thinking of taking a technology break! I felt like I was getting too sucked in to the social media world. Not necessarily too bad as long as I wasn't addicted, but I felt like I was constantly checking them to see what was going on, whether it be Facebook, Pinterest, Instagram, or here at my blog. I wanted to take a break and really just do things. Things which includes picking up the phone to call someone and not just shooting them a text or what not. I would have to say I have been pretty successful, but lets be honest here, in our day and age, if you are not avid on your social media, you may lose touch with some people, specially if they are long distance.

Another good thing about my mini hiatus, I found other things to do on the internet. This includes finally opening my Etsy shop! Please take the time to peek around! Ethan's Imprints on Etsy!

Tuesday, September 10, 2013

Falling in love with Fall!


I have always been a huge fan of warmer weather and as soon as a hint of cold air hits, I automatically get into this mini panic mode. I guess working in retail, let alone as a manager, for the past few years has caused me to feel a slight dread when the seasons change.

In the retail world, September is usually the beginning of Holiday prep. It's definitely not the kind of prep others get to do. While others start their Christmas shopping and plan out their Halloweens and Thanksgiving, we are already in a Christmas mentality. With all the hustle and bustle,  next thing you know, it's January.


This is my first September not having to worry about anything like that. I'm looking forward to our State Fair, eating Elephant Ears and Caramel apples. I'm taking my time planning my son's Halloween costume. To top it all off, I feel the excitement of  the upcoming months!

Fall is about colorful leaves, brisk cool air, pumpkin treats, warm cider, fall boots, and cute cardigans! I'm going to take my time and enjoy the rest of this great year and I hope you all do as well!

Sunday, September 8, 2013

Moxie Fab World: Tuesday Trigger

I have been intending on participating in the Moxie Fab challenges, but never remembered to do the projects until after it's final day! I need to set a weekly reminder or something so I can do it regularly! They always have something fun and cute going on!


This was a two weeker challenge, but of course I am linking up at the very last day of the challenge. That's definitely an improvement from trying to link up the day AFTER the challenge! This week's Tuesday Trigger is Honoring Ombre. The Ombre trend is going strong and I definitely don't see it going anywhere soon.


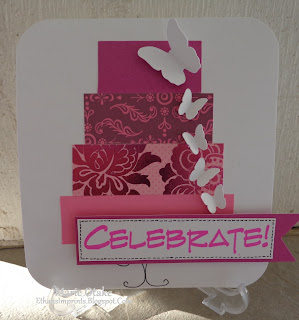
This is my interpretation of the challenge. You are free to create however it inspires you, but I was literally inspired by the cake, colors, and beautiful butterfly. I always aspired to be a pastry chef, but it never really happened, so why not create cakes with paper. It may not be edible, but it's fun and still a great gift to give!


For the cake, I ued DCWV's Cherry Limeade Stack and solid cardstock. The butterflies were made using My Quiet Book Cricut Cartridge. 

To form the cake, I used my circle cutter to make 1.5", 2", 2.5", and 3" circles. I cut 1" stripes of cardstock and constructed the cake. I "Sprinkled" my cake with .5" butterflies and topped it off with a larger one. I finalized by placing it on a cupcake stand I created by cutting out a 4" circle and attaching legs.


Being the paper saver that I am, I couldn't just discard my remaining strips of paper, so I decided to make a matching card. I trimmed each strip to be .5" smaller than the previous and stacked it on to a 5" by 5.5" cardstock. I rounded the corners of my card to give it that softer look. I doodled what is supposed to be a cake stand, and added on my extra butterflies from my cake. 

I then stamped a sentiment using Fiskars Birthday Cheer Cling Stamp. I trimmed the paper and created faux stitching around it, then placed it on a colored piece of cardstock. I adhered it onto my card using foam squares.

This duo would be a great gift for a birthday, wedding, or anniversary. 

Thank you for stopping by and checking out my first ever Moxie entry!
I hope to see you again!


Saturday, September 7, 2013

Happy Halloween!!


Okay, so I may be a little early with the Halloween decor, but I have been on a wreath roll! I wanted to make a wreath for a gift for friends, so I made one as a practice wreath since I have never made one before, but I can't seem to stop making them! I'm waiting on supplies I ordered for their wreath, so until then, I will be making other wreaths. Since I just finished a fall wreath, Naturally a Halloween wreath was next on the list.


Supplies:
Plumbing Foam
May Arts Ribbon:


Thanks for stopping by!

Friday, September 6, 2013

UnWINEd with Unity.


When I saw this adorable stamp at Unity Stamp, I absolutely fell in love with it! I've been on a crafty budget, so I haven't been able to snag it! But lucky day, I was recently a winner at Unity Stamp and was able to choose this fun little guy as my prize!! This stamp set makes me think of one of my BFF's, so naturally I wanted to make something for her. She recently just moved in to a new apartment, so I created this fun wall decor for her!


Supplies:
Cashmere Dame Cardstock and Embellishment
Studio 112 Embellishments
Foam adhesives

Cut and cover your wood board with patterned cardstock.
Place your frame above it using foam adhesives to create dimension.
Stamp sentiment onto patterned cardstock.
Stamp bottle onto separate cardstock, cut out, and adhere using foam squares
Embellish with gems.
Attach ribbon for a stylish way to hang!

Thanks for stopping by!


Thursday, September 5, 2013

Zappy Birthday!


This is my first official Zappy Dot project and it was definitely a fun one! When they told us to pick some flairs to play with, I was definitely excited! One of the first ones that stood out to me where these Birthday Wishes flairs. I initially wanted to do a set of cards with these, but it grew into an all out birthday party! I partnered up Zappy Dots' flairs with DCWV's Birthday Wishes Stack.


I created a gate fold card, fun straw embellishment, party favor bag, and a ribbon which the birthday celebrant can wear.


Anyone who knows me well, knows my crazy sweet tooth, so for this post, I will tell you how I created my cupcake. Some of you may be familiar with my ribbon cupcakes, well I have my paper cupcakes inspired by a post I saw on DCWV's FB page!

Supplies:
Foam ball
Small flower punch
Ribbon
Cardstock
Scor board
Adhesives
and of course, Zappy Dots.

For my cupcake holder, I took a strip of 12" x 2" cardstock and scored it every 1/4" lengthwise
Use adhesve to attach both ends together. Now you will have the start of your cupcake base.
Glue your foam ball onto your base. It's now ready to be "frosted"
I took another color cardstock and punched out TONS of little flowers.  
I glued them all over the top of my foam ball until it was completely covered.
I tied ribbon around my cupcake base to add some pop of color and to give it more of that cupcake liner shape, then I topped it off with my Zappy Dot Flair!


Thanks for stopping by!


First Wreath Ever!


I have been racking my brain for the perfect handmade gift for two of my friends, and after talking to coworkers yesterday about wreaths, I was inspired to make one for them. I have never created a wreath before, so I decided to make a practice wreath before I tackle their presents! With the fall season coming upon us, I had to make a fall themed wreath! And yes, that is sequins on my wreath!


I took plumbing foam and trimmed it to the size I needed. I created a circle and duct taped it down to create my wreath base. I had sequined fabric stashed, so I tripped it to 3 inch strips and used it to wrap around my base. My fabric was a bit thin, so I wrapped it around twice.


To embellish my wreath, I made ribbon roses and feathers.

Quick tutorial on the feathers:
Using the WZ Wired 4 inch wired ribbon:
I cut my ribbon in 4-7 inch pieces, depending on how long I wanted it.
Using the gate fold, I now have the wire edges both in the center.
I cut it into a leaf/feather shape, then trimmed bits and pieces on the side to create the feathered look.

Supplies:
Plumbing foam (less than $2 at Lowes, and I was able to make 2 wreaths out of one)
Duct Tape
Fabric
May Arts Ribbon:
KK Series - 3"
XY Series - 1.5"

Thanks for stopping by!

Wednesday, September 4, 2013

New 10 Minute Craft Dash #25

Pretty Pink Posh just posted a new 10 Minute Craft Dash. I had to take advantage while the little one is sleeping. Of course, with a rambunctious 2 year old, every craft session seems like a craft dash to me, unless he is sleeping!

Here are the fun colors for the new Craft Dash! Just perfect for a baby card that I intended on creating! As always, we can have our supplies out ahead of time.


My Supplies:
Cardstock
Remarks Alphas
Washi Tape
Foam adhesives
Chipboard Words (Not in picture)


Here is my final project! I added the chipboard words afterwards. I kept looking at it and it felt like it needed a little something, so I added it after the timer had stopped. It only took me a few seconds to get it on there, (It took me longer just to find where I had place my chipboard words), so I would have still been well under 10 minutes!


For the card, I started with a 4 1/4" by 5" base card. I trimmed a strip of my yellow patterned cardstock, and adhered it with foam squares. I cut a tag shape with my chevron cardstock. I used my brown cardstock and cut small banners out. I "hung" the banners on the twine and wrapped the twine around the tag. I glued the tag down, added my flair and some washi accents. I topped it off with my chipboard words.

I had clothes pins pictured in my supply list because I was initially going to use it to "hold" my twine, but didn't work out so well


Thanks for stopping by!


Tuesday, September 3, 2013

FAB!!


I hope everyone enjoyed their 3 day weekend (for those who had a 3 day weekend). We went to Great Wolf Lodge and my little one had a blast!! Now it's time to get back to work and for some of you, for the kidlets to get back to school!

I wanted to share this fun card I used with some of my most recent goodies!  


I am loving Zappy Dots Moustache Flairs, Fun Masking Sticker Set, and 

The card was super simple! I rolled a 3 different chevrons onto my A2 card using Studio G Ink.
I then adhered a strip of my Masking Stickers, stamped my Studio 112 Fab stamp onto a scrap piece of paper. I then cut this sentiment out and adhered it on top of my Masking Sticker and topped it off with my flair button!

Thanks for stopping by!